Quick start
From nothing to a printed receipt in about five minutes, in JavaScript, React or Vue.
You need a Windows PC with a printer that already prints from Windows, and a web app built with a bundler, such as Vite.
1Install the app
Download the Taprel app (the file ending in _x64-setup.exe) and run it on the PC with the printer. It needs no admin rights, and after a short guide it runs in the tray, next to the clock.
In the app, open Printers and check that your receipt printer’s type is Receipt.
2Add the package
npm install @taprel/sdk
npm install @taprel/react
npm install @taprel/vue
@taprel/react and @taprel/vue include @taprel/sdk, so everything in it can be imported from them too.
3Set it up
// src/printer.ts: import it wherever you print.
import { PrintClient } from "@taprel/sdk";

export const printer = new PrintClient();
import { TaprelProvider } from "@taprel/react";

export default function App() {
  return (
    <TaprelProvider>
      <PrintButton />
    </TaprelProvider>
  );
}
import { createApp } from "vue";
import { createTaprel } from "@taprel/vue";
import App from "./App.vue";

createApp(App).use(createTaprel()).mount("#app");
This connects nothing yet, so opening a page never asks anything. The first print connects.
4Print a receipt
import { receipt } from "@taprel/sdk";
import { printer } from "./printer";

await printer.printDocument(
  receipt([
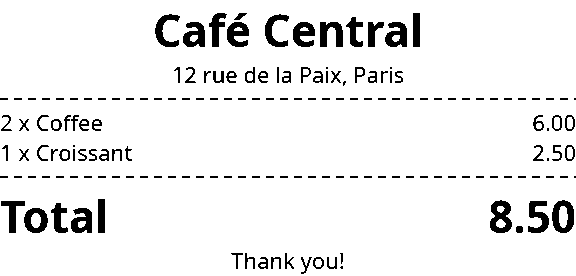
    { text: "Café Central", align: "center", bold: true, size: 2 },
    { text: "12 rue de la Paix, Paris", align: "center" },
    { line: "dashed" },
    { row: ["2 x Coffee", "6.00"] },
    { row: ["1 x Croissant", "2.50"] },
    { line: "dashed" },
    { row: ["Total", "8.50"], bold: true, size: 2 },
    { text: "Thank you!", align: "center" },
    { cut: true },
  ]),
);
import { receipt, usePrint } from "@taprel/react";

function PrintButton() {
  const { print, isPrinting } = usePrint();

  const printReceipt = () =>
    print(
      receipt([
        { text: "Café Central", align: "center", bold: true, size: 2 },
        { text: "12 rue de la Paix, Paris", align: "center" },
        { line: "dashed" },
        { row: ["2 x Coffee", "6.00"] },
        { row: ["1 x Croissant", "2.50"] },
        { line: "dashed" },
        { row: ["Total", "8.50"], bold: true, size: 2 },
        { text: "Thank you!", align: "center" },
        { cut: true },
      ]),
    );

  return (
    <button disabled={isPrinting} onClick={printReceipt}>
      Print a receipt
    </button>
  );
}
<script setup lang="ts">
import { receipt, usePrint } from "@taprel/vue";

const { print, isPrinting } = usePrint();

function printReceipt() {
  print(
    receipt([
      { text: "Café Central", align: "center", bold: true, size: 2 },
      { text: "12 rue de la Paix, Paris", align: "center" },
      { line: "dashed" },
      { row: ["2 x Coffee", "6.00"] },
      { row: ["1 x Croissant", "2.50"] },
      { line: "dashed" },
      { row: ["Total", "8.50"], bold: true, size: 2 },
      { text: "Thank you!", align: "center" },
      { cut: true },
    ]),
  );
}
</script>

<template>
  <button :disabled="isPrinting" @click="printReceipt">Print a receipt</button>
</template>
It goes to the printer set as Receipt, so it needs no printer name.
5Allow it once
The first time, the app asks Allow this website to print? Click Allow, and the receipt comes out.
On your own computer this is free, with no account, up to 50 print jobs a day. Nothing came out? See Troubleshooting.
Next steps
- Receipts Rows, pictures, QR codes and barcodes.
- Labels Text and barcodes at exact positions.
- Printers Pick a printer, and check its status.
- Going live Your customers’ PCs, and a plan for your website.